In today’s digital landscape, safeguarding your organization’s network from unauthorized applications is paramount. One effective strategy is blocking executable (.exe) files using application blocking software or an Active Directory Group Policy.
This tutorial will provide step-by-step guides that will teach you how to block executable files in Windows using various methods. Implementing one of these measures will reduce the risk of unauthorized software installations and usage, further protecting your network as part of a broader cyber risk mitigation strategy.
Block EXEs, Websites, and More With BrowseControl Web Filter
Take control of your network and user productivity with BrowseControl Web Filter. This comprehensive solution blocks distracting and malicious websites, restricts applications, and even filters file downloads and uploads. BrowseControl empowers you to create a secure and focused work environment, all easily managed from a central console.
What Is An Executable File?
An executable file, also referred to as an executable program or simply an executable, is a type of computer file that contains instructions that your computer can directly understand and carry out.
In simpler terms, think of an executable file as a recipe with clear instructions. Your computer (the chef) can follow these instructions (the code) to perform a specific task (cook a meal).
Here are some key points about executable files:
- They are often identified by specific file extensions, such as “.exe” on Windows systems or “.app” on macOS. However, the extension can vary depending on the operating system.
- Executable files are essential for running programs on your computer. When you double-click on an icon to open a program, you are essentially running the program’s executable file.
- While executable files are necessary, it’s important to be cautious. Some malware can disguise itself as an executable file. It’s recommended to only run executables from trusted sources.
Examples of Windows Executable File Types
On Windows, several file extensions denote executable files.
Common file extensions for executable files are:
- .exe (Executable): This is the most common extension for executable programs on Windows. When you double-click a file with this extension, Windows tries to load and run the program.
- .bat (Batch File): Batch files are script files that contain a series of commands for the Windows command line interface (CMD).
- .cmd (Command Script): Similar to .bat files, .cmd files are also executable scripts that can be run from the command prompt.
- .scr (Screensaver): This extension identifies screensaver files that can be executed to activate a screensaver on your computer.
- .msi (Microsoft Installer): These files are used to install applications on Windows. For complex software deployments, .msi is preferred due to its control and reliability.
How Is An Executable File Different From A Data File?
The key difference between an executable file and a data file lies in what they tell the computer to do:
- Executable File: Contains a set of instructions, like a recipe, that the computer’s processor can directly understand and execute (carry out) to perform a specific task.
- Data File: Stores information or data that needs to be interpreted by a program before it can be used.
Some additional points:
- File Extensions: Executable files often have specific extensions that signal to the operating system they contain instructions.
- Opening Files: Executable files can be directly run by the operating system, while data files require a specific program to open and interpret them.
Why Block EXE Files?
Block EXE Files to Improve Cybersecurity
Unauthorized EXE files are often blocked for security reasons. While EXEs are the most common way for programs to run on Windows, a downloaded executable file may contain harmful software known as malware (malicious software) designed to compromise computer systems for data exfiltration, ransomware, and other cyber attacks.
Preventing the downloading and/or executing of EXE files and other executables helps prevent end-users from accidentally running harmful programs that could steal information, damage computer systems, or spread to other devices.
However, blocking all EXE files would prevent the installation of legitimate software. So, security teams use a combination of approaches to prevent unauthorized software installation while allowing for legitimate software to be deployed.
- Principle of least privilege: In business environments, it is best practice to enforce the principle of least privilege, where users are typically given the minimum permissions required to perform their tasks to prevent them from installing software programs.
- Blocking EXE downloads for end-users: Security measures can be further enhanced by outright preventing the downloading of certain files to ensure that only authorized IT personnel install new software.
- Scanning files: Security software can be configured to analyze .exe files before they are run.
Improve Privacy by Preventing EXE Files From Connecting to the Internet
Some PC gamers may want to block their games from being able to connect to the internet. Blocking an app or a game can help you protect your privacy, eliminate unwanted advertising, or prevent children from playing online games.
Most apps and games you install in Windows have, by default, unrestricted access to the internet. However, you can control their internet access through the Windows Firewall. With it, you can block access to the internet for specific apps and games, on all types of network connections, or specific types of network connections.
Blocking specific EXE files from connecting to the internet can be important for several reasons:
- Privacy: Some applications may send data about your computer or internet usage to external servers without your knowledge. Blocking these connections helps protect your personal information.
- Security: Preventing certain EXE files from accessing the internet can reduce the risk of malware or unauthorized software communicating with malicious servers.
- Control Over Updates: Some programs automatically update themselves, which can sometimes cause issues or unwanted changes.
- Preventing Ads and Unwanted Content: Some applications display ads or other unwanted content that can be blocked by cutting off their internet access.
Which EXE Files to Block
- Unauthorized cloud storage apps: With a web filter you can block access to cloud storage sites and block their associated EXE files, such as: Google Drive (googledrivesync.exe), Dropbox (Dropbox.exe), OneDrive (OneDrive.exe), iCloud Drive (iCloudDrive.exe), Box (Box.exe), MEGA (MEGAsync.exe), pCloud (pCloud.exe)
- Built-in Windows games apps: Proactively blocking games mitigates one of many temptations to get distracted from work: Microsoft Solitaire Collection (Solitaire.exe), Microsoft Minesweeper (Minesweeper.exe), Microsoft Mahjong (Mahjong.exe), Microsoft Sudoku (Sudoku.exe), Microsoft Jigsaw (Jigsaw.exe)
- Apps with access to sensitive data/systems: To further enforce the principle of least privilege, you can proactively prevent specific users from launching apps that they do not have an explicit business need to access, such as CRM systems.
As part of your application control strategy, you should also have methods for monitoring application usage. This ensures you have visibility into any unblocked applications that you may want to add to your block list.
How to Find the Original Name of Specified Windows Applications
Many application blocking methods in this tutorial require the “original filename” of the EXE you would like to block.
The original filename for Windows apps refers to the internal name assigned during the application’s creation, not necessarily the one you see on your computer. Here’s a breakdown of why it’s important:
- Embedded Information: This name is stored within the executable file itself, often in a format called the Portable Executable (PE) header.
- Renaming Doesn’t Change It: Even if you rename the application file on your disk, the original filename remains embedded within the program.
- Security Purposes: This embedded name can be helpful for security. For instance, malware might disguise itself as a legitimate program.
- Application Identification: The application can also use the original filename to determine if it’s been renamed.
1. Manually Locate The Original Filename Of An Application
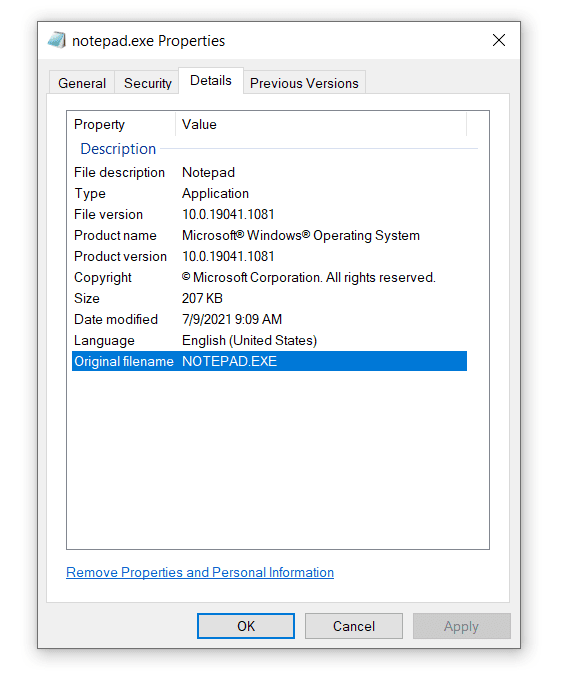
- Right-click on the .exe file in Windows Explorer and select Properties.
- Select the Details tab; you will find the Original Filename in the “Value” column next to the “Original filename” property. Not all Original File names have the .exe suffix extension. e.g. FreeCell has no extension so just enter “FreeCell”.
2. Find the Original Filename in BrowseReporter’s Software Usage Dashboard
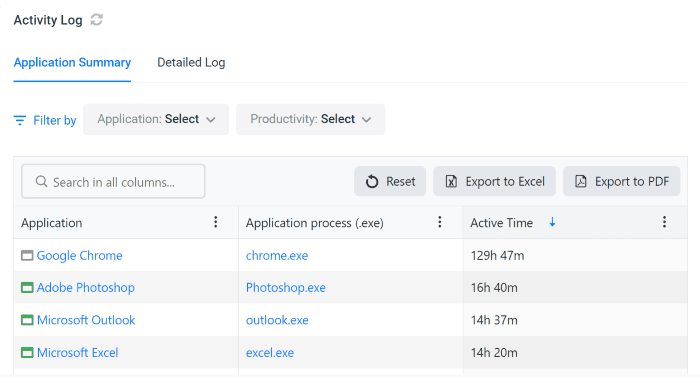
BrowseReporter’s software utilization reports and dashboards give you insights into both desktop apps and SaaS tools.
- Track SaaS and software usage on Windows computers to detect the use of unsafe or unproductive programs.
- Use the Windows software usage reports to improve software usage tracking in the workplace and better manage software licenses
- Use the drilldown dashboard to find out the utilization rate of specific pieces of software
With BrowseReporter’s software usage reports, you can easily get the Original Filenames of previously used applications. This allows you to identify unwanted software usage and block the apps using BrowseControl.
BrowseReporter and BrowseControl operate from the same central web console, allowing you to manage all your devices from the convenience of a web browser.
How to Find Original Filenames Using BrowseReporter
- Open BrowseReporter
- Go to the applications activity dashboard
- Scroll down to the Activity Log
- Click on the Column Menu icon and check “Application process (.exe)” to display the Original Filename of all previously used apps
Methods for Blocking EXE Files
Block EXEs From Launching With BrowseControl Application Blacklisting Software
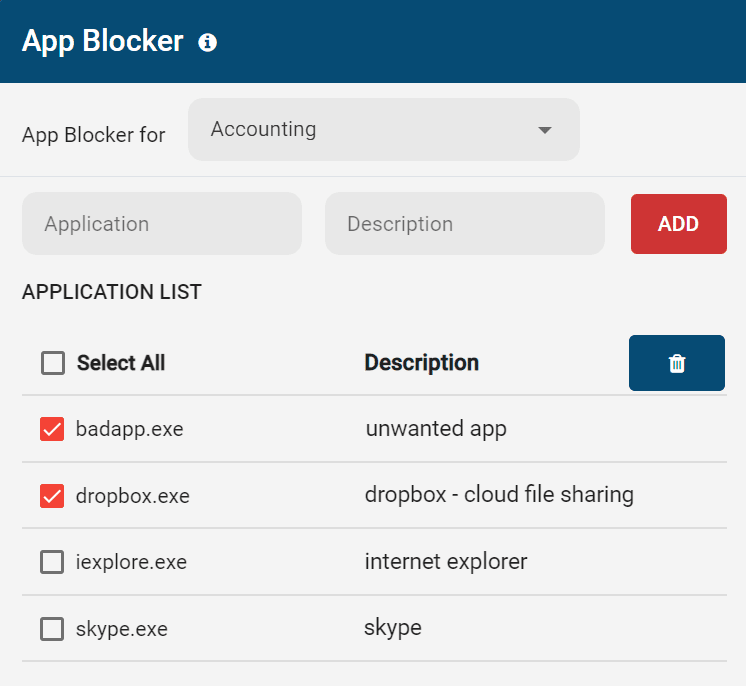
With BrowseControl’s application blocker, you can prevent .exe files from running on your computers. The blocker can also block Windows applications such as cloud storage services, games, etc.
Get Your Free Trial
To start, download the free trial, install the client on your users’ computers, select the user/PC groups you want to restrict, then add the unwanted program files to BrowseControl’s App Blocker.
1. CurrentWare.exe: CurrentWare server & console setup file—to be installed on a local computer, server, cloud virtual machine, etc
2. cwClientSetup.exe: CurrentWare client setup file—to be installed on the employee or student’s computer
The BrowseControl Windows application and website blocker are compatible with various Windows operating systems, including Windows Server, Windows 7, 8/8.1, 10, and 11.
Learn More: BrowseControl System Requirements
Add the Apps You Want to Block to the App Blocker
- Open BrowseControl from the left-hand menu.
- Click a folder of users or computers from the Groups list that you want to restrict
- Click on the App Blocker option.
- Enter the Original Filename of the certain apps to be blocked in the Application textbox. An optional description can also be entered.
- Click the ADD button to add the Application to the list of apps that can be blocked
- Select the applications you want to block from the Applications List on the left pane and move them to the right pane by clicking the Arrow button. They will now be blocked for the computers and users under the specific Group
- Add an optional Warning Message that will be displayed in a popup when the user tries to launch the blocked app
- Click “Apply to Clients” to block apps in the Blocked Application List for the selected group of computers or users
Block File Downloads/Uploads

With web filtering and download blocking software such as BrowseControl you can prevent the uploading and downloading of files, including executables such as .exe, archive file formats such as .zip, and any other file extension.
To further prevent the launching of unwanted applications, you can restrict USB device usage with a USB blocker such as AccessPatrol to prevent your end-users from launching executables from unauthorized portable storage devices.
Benefits of Blocking File Downloads
- Data Loss Prevention (DLP): Prevent employees from downloading confidential files and copying them to rogue USB devices.
- Cybersecurity: Protect your endpoints and network by preventing the downloading of malicious software
- Legal Liability: Prevent employees from using company resources to pirate copyrighted software
- Bandwidth Efficiency: Prevent the downloading of large files such as videos and music that cause a significant strain on bandwidth
- User Productivity: Prevent your users from downloading distracting video games and movies

Shady Maple found CurrentWare during a significant period of growth in their company. As their number of employees grew, Shady Maple knew that they needed an employee productivity solution that was scalable.
Their old ways of managing employee internet abuse—manually checking each employee’s computer individually and hoping that they didn’t clear out their web history—would no longer be sustainable.
Read our case study to learn how employee internet use monitoring and web filtering software transformed Shady Maple’s employee productivity management strategy.
GPO to Block Software By File Name (Local Group Policy Editor)
One effective strategy for restricting executable (.exe) files is through a Group Policy Object (GPO). The Group Policy feature within Active Directory allows you to manage user and computer settings across a network domain.
Limitations of this method:
- You can only use filenames, no paths, hashes or certificates.
- This policy only prevents users from running programs that are started by the File Explorer process. It won’t prevent users from launching programs that use a system process or other means like Command Prompt, Task Manager, or other applications.
- Users with administrative privileges might still be able to bypass this restriction.
Requirements:
- Access to a computer joined to a Windows domain with Group Policy configured.
- Administrative privileges on the domain controller.
Notes: The best practice is to create a new group policy rather than leveraging an existing one. This allows for more flexibility on what policies are applied to different OUs.
Steps:
- Open Group Policy Management: Search for “gpedit.msc” in the Start menu and press Enter.
- Navigate to the Policy: In the Group Policy Management Console tree, navigate to: To block executables based on computers: Computer Configuration > Administrative Templates > System. To block executables based on users: User Configuration/Administrative Templates/System/Run only specified Windows applications.
- Find the Policy Setting: In the right pane, locate the policy setting named “Don’t run specified Windows applications.”
- Enable the Policy: Double-click the policy setting to open its properties. Select “Enabled” to activate the policy.
- Add Blocked Applications (EXEs): Click the “Show…” button to open a window for adding blocked applications. Click “Add…” to add each EXE you want to block. Browse to the location of the EXE file and select it. Click “Open” to add the EXE to the list. Repeat for all the EXEs you want to block.
- Apply and Close: Click “Apply” to save your changes. Click “OK” to close the policy properties window.
- Group Policy Update (Optional): Depending on your Group Policy configuration, you might need to enforce the updated policy on domain members.
Application Whitelisting Using Software Restriction Policies
Note: Software Restriction Policies were deprecated beginning with Windows 10 build 1803 and also applies to Windows Server 2019 and above. You should use Windows Defender Application Control (WDAC) or AppLocker to control what software runs.
Here are the high-level steps for whitelisting applications using Software Restriction Policies in Windows.
- Open the Local Security Policy Editor: Type secpol.msc in the Start Menu search bar and press Enter. Navigate to Security Settings > Software Restriction Policies.
- Create a New Software Restriction Policy: Right-click on Software Restriction Policies and select New Software Restriction Policies.
- Set the Default Security Level: Under Security Levels, set the default security level to Disallowed. This ensures that only explicitly allowed applications can run.
- Define Additional Rules: Create rules to allow specific applications. You can define rules based on:
- Path: Specify the file path of the executable.
- Hash: Use a hash value of the executable.
- Certificate: Use the digital certificate of the application.
- Network Zone: Specify the network zone from which the application is allowed to run.
- Apply the Policy: Ensure the policy is applied to the appropriate user groups or organizational units (OUs) within your domain.
- Test the Policy: Before deploying widely, test the policy in a controlled environment to ensure it does not block legitimate applications.
- Monitor and Adjust: Continuously monitor the policy’s effectiveness and make adjustments as necessary.
Learn More: Application Lockdown with Software Restriction Policies
Additionally, for a more scalable option you can configure Software Restriction Policies with a GPO rather than using the local system’s secpol. This allows you to implement the policy domain-wide rather than updating each PC manually.
Windows Defender Application Control (WDAC)
“Generally, customers who are able to implement application control using WDAC, rather than AppLocker, should do so. WDAC is undergoing continual improvements, and is getting added support from Microsoft management platforms. Although AppLocker continues to receive security fixes, it isn’t getting new feature improvements.” – Microsoft Knowledge Base
While Windows Defender Application Control (WDAC) offers robust application control, it’s important to understand that it’s a more complex feature than Group Policy for basic EXE restrictions.
Here’s why WDAC might not be ideal for simply blocking specific EXEs:
- Complexity: WDAC involves creating policies with detailed rules defining allowed applications and their behavior. It requires a deeper understanding of security configurations.
- Not User-Friendly: WDAC is primarily aimed at enterprise environments with IT professionals managing security.
- Potential Overkill: WDAC might be overkill for blocking a few EXEs compared to using Group Policy or creating exceptions within your antivirus software.
However, if you’re still interested in using WDAC to block software, here’s a general overview of the process (remember, it’s recommended for experienced users):
- Prerequisites: WDAC is only available on specific Windows versions (Pro and Enterprise editions, typically). You’ll also need to enable it through Group Policy or a separate configuration tool.
- Policy Creation: You’ll need to create a new WDAC policy defining the allowed applications. This involves specifying file paths, digital signatures, and other criteria for permitted EXEs.
- Blocking Specific EXEs: Within the policy, you can define rules to block specific executable file paths.
- Deployment: Once configured, the WDAC policy needs to be deployed to your system(s).
Learn More: WDAC Deployment Guide
Windows AppLocker
“Generally, customers who are able to implement application control using WDAC, rather than AppLocker, should do so.” – Microsoft Knowledge Base
What is Windows AppLocker?
Introduced in Windows 7, AppLocker helps to prevent end-users from running unapproved software on their computers. AppLocker policies can apply to all users on a computer, or to individual users and groups.
AppLocker rules can be defined based on:
- Attributes of the codesigning certificate(s) used to sign an app and its binaries.
- Attributes of the app’s binaries that come from the signed metadata for the files, such as Original Filename and version, or the hash of the file.
- The path from which the app or file is launched.
AppLocker is best when:
- You have a mixed Windows operating system (OS) environment and need to apply the same policy controls to Windows 10 and earlier versions of the OS.
- You need to apply different policies for different users or groups on shared computers.
- You don’t want to enforce application control on application files such as DLLs or drivers.
AppLocker can also be deployed as a complement to WDAC to add user or group-specific rules for shared device scenarios. As a best practice, you should enforce WDAC at the most restrictive level possible for your organization, and then you can use AppLocker to fine-tune the restrictions further.
AppLocker System Requirements
AppLocker policies can be deployed using Group Policy or an MDM. They can only be configured on and applied to devices running on supported versions and editions of the Windows operating system. For more info, see the requirements to use AppLocker.
How to Block EXEs with AppLocker
Preparation:
- Administrator Access: Ensure you’re logged in with an administrator account. AppLocker requires administrative privileges for configuration.
- AppLocker Service: Open an elevated command prompt and type: sc query AppLocker. This verifies if the “AppLocker” service is running. If the status says “RUNNING”, you’re good to proceed.
Creating an AppLocker Rule:
- Open Local Security Policy: Search for “secpol.msc” and open the Local Security Policy editor.
- Navigate to AppLocker Rules: Expand “Security Settings” in the left pane, then navigate to “Application Control Policies” -> “AppLocker.”
- Choose the Appropriate Rule Collection: Select “Executable Rules” to block an EXE.
- Create a New Rule: Right-click on “Executable Rules” and select “Create Default Rules” (optional) or “Create New Rule.”
Defining Block Rule for EXE:
- Rule Name: Provide a clear and descriptive name for the rule (e.g., “Block ProgramName.exe”).
- Action: Select “Deny” to block the execution of the program.
- Users/Groups: Choose the user group or individual user for whom you want to apply this blocking rule.
- Permissions: Leave the default settings for “Permissions” unless you have specific requirements.
- File Path or Publisher: Select “This file path” and browse to the file, or use a file hash value via PowerShell’s “Get-FileHash” command.
- Review and Finish: After specifying the blocking criteria, review the rule summary. Click “Finish” to create the rule.
Verifying the Block: Try launching the EXE you blocked. If AppLocker is functioning correctly, you should receive an error message indicating the program is blocked.
Additionally, for a more scalable option you can configure AppLocker settings with a GPO rather than using the local system’s secpol.
How To Block a Program From Accessing the Internet With Windows Firewall
Note: The built-in firewall is named Windows Defender Firewall in Windows 10, and Windows Firewall in the older versions of Windows
Windows 10/11 Tutorial
- Identify the file that you need to block in the Windows Defender Firewall (See: How to find the Original Filename); you will need the source path of the EXE as well for this method
- Open Windows Defender Firewall With Advanced Security by typing “wf.msc” in the search box and clicking the result with the same name.
- In the Windows Defender Firewall with Advanced Security window, click Outbound Rules in the navigation panel on the left. Then, click or tap New Rule in the Actions panel on the right.
- The New Outbound Rule Wizard guides you through the steps needed to create the outbound rule. First, choose the Rule Type. Select Program. Click or tap Next.
- Press Browse and, in the Open window, go to the location of the executable file that you want to block, select it, and press Open. Then, click Next.
- Select “Block the connection” and press Next.
- On the Profile screen, you can define when the rule will be applied. To ensure internet access is blocked at all times, select all network locations and press Next.
- Name your new rule, then press Finish
Important Notes:
- This process restricts the program from initiating outbound connections to the internet. It won’t necessarily prevent the program from functioning entirely, but it will limit its ability to communicate online.
- Windows Firewall might already have some default rules for common programs. To avoid conflicts, double-check existing rules before creating a new one.
- Blocking system programs can cause unintended consequences. Only block programs you’re confident you don’t need internet access for.
- For a more scalable option, you can configure Windows Firewall settings with a GPO. This allows you to implement the policy domain-wide rather than updating each PC manually.
Windows 7 Tutorial
Blocking programs from internet access in Windows 7 with Windows Firewall differs slightly from the newer versions. Here’s how to do it:
- Open Windows Firewall: Click the Start menu and search for “firewall.” Select “Windows Firewall” from the search results.
- Choose Advanced Security (Optional): For a more detailed view, click “Advanced settings” on the left side.
- Manage Outbound Rules: In the left pane, select “Outbound Rules.”
- Create a New Rule: In the right pane, click on “New Rule…”
- Select Rule Type: Choose “Program” from the “Rule Type” options and click “Next.”
- Specify Program Path: Select “This program path” and click “Browse.” Locate the executable file (“.exe”) of the program you want to block. Click “Next” after selecting the correct path.
- Block the Connection: Choose “Block the connection” and click “Next.”
- Define Connection Profiles: Select the network profiles where you want this rule to apply (Domain, Private, Public) – typically all three for comprehensive blocking. Click “Next.”
- Name the Rule (Optional): Provide a descriptive name for the rule. Click “Finish” to create the rule.
Conclusion
There is a toolbox of methods at your disposal to address unwanted executable files. Whether you are a business that needs application blocking software for a centralized approach, an SMB that is content with using Group Policies for domain-wide control, or a small shop using built-in Windows features like AppLocker, there’s a solution to fit your needs.
By understanding these methods and applying them strategically, you can create a safer and more secure environment.
Block EXEs, Websites, and More With BrowseControl Web Filter
Take control of your network and user productivity with BrowseControl Web Filter. This comprehensive solution blocks distracting and malicious websites, restricts applications, and even filters file downloads and uploads. BrowseControl empowers you to create a secure and focused work environment, all easily managed from a central console.