Client Deployment using Active Directory with .MSI file
The purpose of this document is to help Network Administrators deploy the CurrentWare client to workstations on their Windows Active Directory Domain.
This procedure is targeted to Network Administrators familiar with deploying software through Group Policies in an Active Directory environment.
Download CurrentWare Client Setup File
Step 1: Download Orca
Orca is used to modify the content of a .msi file.
Use Orca to modify the configuration settings of the cwClientSetup.msi (CurrentWare Client setup file).
Orca Download link: http://www.softpedia.com/get/Authoring-tools/Setup-creators/Orca.shtml
After installing Orca on your machine, you will be able to right-click on any MSI package and open it in Orca.
Step 2: Create a share and Edit the MSI
The modification of the CurrentWare Client MSI for your network:
- Edit the cwClientSetup.msi file with Orca
- Go to the Property Table and change the Value for the USERPARAMS property to
-p Admin -ds MyCWServer -rp Admin -sp AdminNote: Change the MyCWServer value to the computer name of the CurrentWare Server.
- Save the file as msi in your shared folder.
Step 3: Put the cwClientSetup.msi file in a shared folder and set the permission
Create a share folder on your network for the CurrentWare Client MSI file (\\yourserver\cwsoftware), this will serve as the location where you can store your CurrentWare Client MSI file.
Put the installation file (.msi file) into a folder, and share the folder on your network, make sure “everyone” has read permission for that folder
Step 4: Creating the Group Policy Object for the CurrentWare client install
- Create an OU and put the computers you want to deploy the CurrentWare Clients to in this OU.
- Create the following GPO and link them to the target OU: BC Install
Step 5: Edit the GPOs
Edit the BC Install GPO as follows:
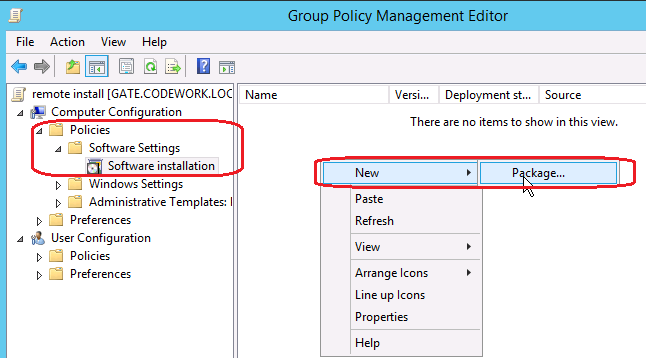
- Go to Computer Configuration\Software Settings within the GPO and right-click Software Installation and select New/Package.
- In the File Name dialog box, enter the UNC path to your cwClient.msi file .. Select Open.
- In the Deploy Software dialog box that appears, select Assigned as the deployment method and click OK.
- In the group policy management console, right-click an OU that you want to do the remote installation, click “Link an Existing GPO”
- Choose the GPO you just created, then click OK
Step 6: Executing the GPO on the Client computer:
By default, the computer Group Policy is updated in the background every 90 minutes, with a random offset of 0 to 30 minutes.
If you want the group policy to run immediately, follow the steps below on the Client computer.
- Run GPUPDATE /FORCE on the computer to update their GPO.
- A DOS prompt will ask you to restart the computer to update the computer policy.
Related Articles
Client Deployment using Active Directory with Batch File
The purpose of this document is to help network administrators deploy the CurrentWare client to workstations using a batch file and Window’s Group Policy. This procedure is targeted to network administrators familiar with deploying software through ...Client Deployment using PDQ Deploy
The purpose of this document is to help IT teams deploy the CurrentWare client to workstations using PDQ Deploy. PDQ is a well known software company that deals with deployment and computer management within the IT industry. Requirements: PDQ Deploy ...Integrating Active Directory (AD Sync) with CurrentWare
With just a few simple steps, you can effortlessly import user profiles and organizational structures directly from your AD server. This integration ensures that your CurrentWare Server remains in sync with your existing user database, reducing ...Client Deployment using Remote Client Installer – Legacy
Note: This feature is available on the web console as of v9.0.0. Click here to learn how to use this feature from the web console. Important! Windows Firewall and User Access Control (UAC) must be disabled on your target computers. The Remote Client ...Client Deployment using Remote Client Install
As of v9.0.0, we have added the capability to push out clients directly from the web console. Important! Windows Firewall and User Access Control (UAC) must be disabled on your target computers. The Remote Client install is a built-in feature of the ...